Showing posts with label tutorial. Show all posts

Thursday, May 8, 2014

How to make a stuffed cushion in 10 steps

Wow I am really excited to start my first tutorial using my own cushion panels. It's been a a bit of a dream I have had to create as many products with my printed panels as I can. I have had this inner creative nudge going on for a while, & I feel it the right time to start!!
Not only will the things you create be personalised & look really fantastic, it will be a HUGE saving, & most importantly fun & rewarding.

So here we go......

Making a stuffed cushion.


1. When you receive your panel it will need to be cut out. You will receive the panel with some excess fabric around it.

2. Select your backing, have a hunt around for scraps, or select something that is really tonal & co-ordinates beautifully. Make sure to cut it out the same size as your panel.


3. Place your panel & backing fabric together, lay down right sides together. You are about to machine it together, so grab your pins & pin each side to hold it stable.


4. You will only be machining around 3 edges, those that are the 2 longest, & only 1 of the shorter ones. I suggest a 1cm seam. 


Tip : At each corner I like to reverse stitch to make them really secure. Turn your cushion cover inside out so it's in the right way.


5. So your panel should be looking like this now. I use a chop stick to gently push those corners out so they are lovely & square. You can use anything similar.


6. At the open edge of your cushion cover, fold it down 1cm all around & press. 
I measure each time & then secure with a pin. Then I use a warm iron press around the pins until the crease has been made, remove the pins & press firmly across.


Tip - It's really important to have the 1cm turn down even all the way around the opening. It's so your cushion looks rectangular when finished with both edges measuring the same. Otherwise it could look wonky.


7. Now the cushion is starting to take shape! 
It's now time to stuff it, I just use toy fill from my local sewing & craft store. 
It's really a personal choice as to how fat or thin you'd like to stuff your cushion. I love mine nice & plump. As you're stuffing it make sure to push the fill into the corners, & to keep the pieces of fill as evenly sized as possible. It will just solve that potential lumpiness. 
Once you are happy with it, push the fill towards the bottom, so your opening is workable & relative flat.


8. Grab hold of your opening & pin the front panel & backing panel together. Make sure to pin them so they are secure.


9. Place your pinned opening just underneath the machine foot. You will need both hands to guide this through. If your stuffing is too close to the edge it can make the machining of this step a little bit of a challenge. I suggest sewing the opening edges 1cm in from edge. 

10. Steadily machine down your opening about 1cm in from edge & reverse stitch for a secure finish. Continue machining down & as you get closer to a pin just remove it. When you reach the end another small reverse stitch again.


You're finished !!

Fluff your cushion up, give it a bit of a shake so the filing can be moved around evenly.


Your cushion can be washed in cold water only. Please be wary of throwing it in the machine on a regular cycle as it could make the fill a bit lumpy & a funny shape. I would use a gently cycle or just hand wash it.

This tutorial can be used for any cushion you're wanting to create. Any cushion shape, same steps!

As of today you are able to purchase any of my personalised panels for you to create your very own personalised cushion. Just visit my shop for all the details.

To launch my personalised panels I am taking off $3 each panel until the end of Sunday May 11th. 
Large personalised panels will be $18.00 but the special launch price is  $15.00
Small personalised panels panels $15.00 but the special launch price is $12.00
And FREE SHIPPING 

Make sure to email me what you have made as I would love to share it on my Facebook page.


Thursday, March 7, 2013

Display your Instagram photos on your blog

I have been meaning to finish this little job for ages...Adding my Instagram feed to my blog. I am not very tech savvy when it comes to plug in, & my world relies solely on google on how to do anything. I sometimes wonder, if I was ever in trouble, surely I would be OK as long as I could google my way out of anything? Right?
Anyway....it was a simple little process I thought I would share just in case it's one of those jobs you haven't completed yet either. I guess I have just saved you some time.

I used SnapWidget


Filled out this


When I hit get code, which looks like this I copied it.


Then went to my blogger layout & went to add a gadget.


 I selected this option below

I then pasted it in here


I hit save & voila.....done. 

I know this may be something so obvious to most tech savvy people, but personally I love a good idiot proof tutorial haha!!

Have a great day,


Sunday, July 3, 2011

How to make a rice heat bag

I don't know about your kids, but mine of late mine have been getting in the wars. I took for grated that all kids are happy to pop an ice pack on a bump or bruise.
Ummmm nope.
It actually frightens them, well mine anyway. Not that they say it in so many words, but the look on their little faces when you come at them with an over size object that is freezing cold doesn't thrill them.

I have also lately had Hudson say, mummy my bed is cold make it warm.

Like every mum you want to help your little people so to solve this I hunted around & found a few tutorials on heat bags. I was more worried about the contents of it & what to put in it, than making it, I had that all planned out in my head. I found & loved the tutorial from Sew, Mama, Sew, & just adapted it according to my vision. I decided to make them as kiddie friendly as possible, so of course I utilised my own designs.

These heat bags are mini in size perfect for little hands.

You can used any fabric you have laying around the house. Sew up your scraps, even use a tea towel.
I used my very popular owl had to adorn those comforting words, "All better now".
Cut 2 squares, mine are 21cm x 15.5cm.
Place your squares right sides together & sew a 1cm seam allowance all around leaving one whole side open. Turn inside out.

Here is mine turned in the correct way, & I used a chop stick to help push out the corners.

Turn you iron on. At the open end of the heat bag fold a 1cm seam allowance inwards. You can measure this or go by your eye, that's what I do. With the tip of your iron press gently. Go all the way around until the whole opening is turned inwards & pressed.

Press and you will end up with a clean edge like this.

Your are now going to top stitch the whole area of your heat bag. My top stitch width is 0.5cm in from edge. On you pressed seam area, place the foot of your machine on top of the opening. Start slowly & make a quick back stitch, and them follow around the edge of your heat bag.

When you get to about 2cm before where you started before, stop & do again another quick reverse stitch. This will just reinforce the opening.

Now the fun part. I mixed even parts of plain long grain rice and organic lavender in a bowl.
A funnel & one of those free scoops I have received from Tupperware over the years came in very handy.

I found the contents should weigh around 250grams, this what a nice quantity I felt to fill the bag. Once I had filled the bag I shook it to one end & stitched across the opening I had created to fill it.

One happy customer.

I found 1 minute is a lovely temperature to warm for the kids, depending of course on your microwave wattage. This will also be a lovely ice pack for when a situation calls for a cold emergency. To freeze pop the heat bag in a plastic bag, like a freezer bag to protect it.

This method is easily adaptable to any size or shape heat bag.

Enjoy!


Sunday, May 1, 2011

Some eggs for Charlotte

I didn't buy chocolate for Charlotte this year, instead bought some lovely hand painted eggs from Brusselsprout kids. They were so dainty, each with a little ribbon there so they could be hung. That wasn't my intention, it was to pop them in a glass jar. This is what I have come up with.

The eggs, a glass jar, some paper twine in pink which I just love & a pink & white stripe ribbon.

I wanted the looked to be subtle, pretty, & not too over done. Really simple actually. I loosely placed in the twine at the base of the jar, then arranged each egg carefully on top of it, making sure the same design wasn't next to each other. I then placed more twine on top of the eggs, and screwed the lid on.

Done...easy hey?
I decided not to include the pink & white stripe ribbon as it made the whole thing look overdone. Overall I am happy with the simplicity.

I am just surprised that I actually finished something for a change hehehe!

Monday, November 1, 2010

Making a Flashing Web Button


I have known about this little web accessory for sometime now, but I also remember thinking
"HOW THE HELL DO I MAKE ONE OF THOSE"
I also know what it's like to not want to ask a question, just incase you feel like the only person on the planet who doesn't know the obvious answer.
I wanted to very quickly let everyone know how to make a flashing web button.
I am not actual aware of the 'technical' web term for these and would love somebody to let me know.
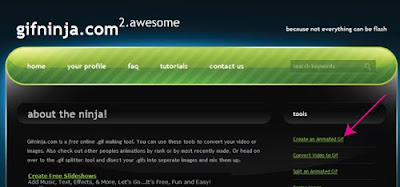
There is a website called gifninja and the best part it's free and so easy to use.

I am going to guide you through it step by step, and have added hot pink arrows.

#1 - Log onto the site and click on create an animated gif

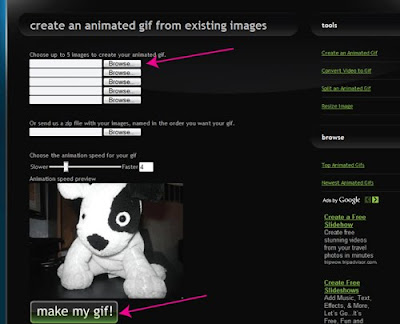
Select your photos you would like to use at the browse tabs.
It's just like loading images onto blogger.
Once selected you have the choice to make your gif flash fast or slower, you can do this just above the dog. Once that's done hit make my gif!

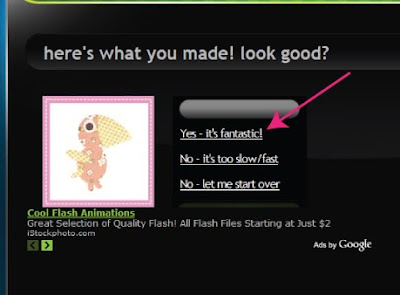
Here you will get a sneak peak as to how your gif will look. To the right you
have the chance to make any changes. Once happy hit Yes - it's fantastic.

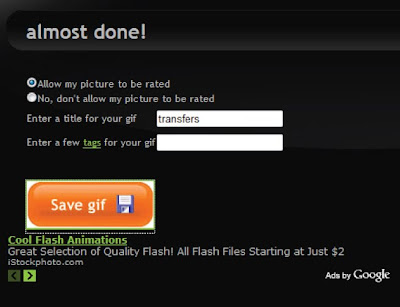
Here all you have to do is call you gif file something.
You can chose whether or not you want your gif to be made public.
I usually say no.
Hit save gif.

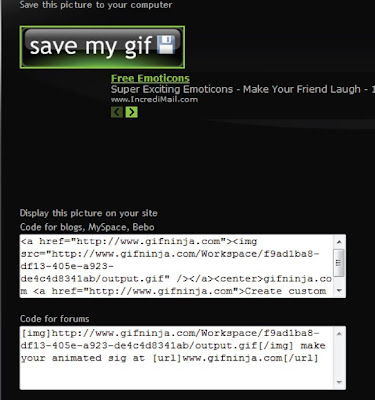
Again hit save my gif. Then save it to you computer where you wish.
Once here it gets a bit tricky as there is some coding you have to delete.

If you don't erase some of this coding, you will have some big type appearing below your flashing button saying GIFNINJA, which I am sure you don't want to have.
Your code will appear in the top box like this.
(remember everyones code will differ slightly)
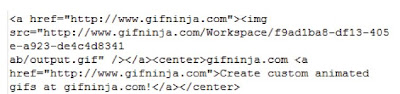
You need to delete all text from the word center to center, be sure to include the

brackets before the first center and the after the last center.

Your text should look like this, compare the two to see.

After that is done all you have to do is copy & past the script to it's desired location.
If you want to use it in blogger, go to you design function, and select the option call html/java script. Paste the code in there and save.

Voila .... done.