Showing posts with label DIY. Show all posts

Tuesday, April 29, 2014

FREE chocolate bar download for mum

Mother's day is sneaking around really quickly.

If you like me & you love a piece of chocolate, & can handle some more after Easter, I have 2 free downloads you could use to give to mum on her special day. Ideal for a handmade block of choccie you have created yourself, or a lovely bonus for mum with it accompanied with another gift. Also lovely to place at the table for your special guests.

There are two to choose from, take your pick.
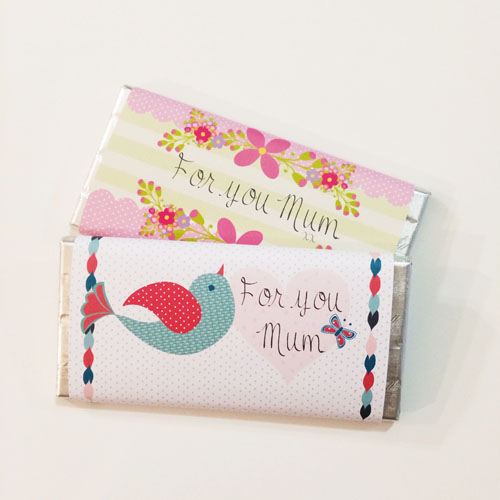


The chocolate wrapper fits a 100gm block.

Simple to use, just print off the image download right here.
I suggest printing on card for its sturdiness.
I used double sided tape to make these. On one edge stick some double sided tape down, & take away tape top layer.
Gentle fold the wrapper around the bar & hold. Place the untaped edge on top of the taped edge & rub your finger securely over it.

Enjoy.


Monday, April 14, 2014

Free Easter garland for the kids to colour in.

My kids are on school holidays, so I have set up a few Easter activities for them to leading up to the arrival of the Easter Bunny.


I drew up some Easter Eggs & printed them on some card & ask them to colour them in. Not only did they really enjoy it, it kept them quite so I could do a little bit of housework.
So I thought if it kept my 2 amused it should very well work on some other kiddy winks.

So here it is;

How to make
1. Print off your eggs on some card stock or heavy white paper.
2. Let the kids get creative with decorating them with textas, pencils, crayons, paint, whatever they love.
3. Cut out each beautiful egg with some scissors.
4. Make a hole at the top of each egg with a hole punch. A pen works just as well if you poke it through gentle.
5. Get some bakers twine, string, ribbon, cotton thread whatever you have floating around to hang it & make it come alive.
6. Make sure you leave a 15-20cm extension at each end so you can hang it. 
7. Tie you first egg with a gentle double knot, so it's secure. If you don't the egg will move around. I suggest a gentle knot so you don't rip the hole, & it also hangs much more nicely.
8. I had a distance of about 12cm between my eggs, (this distance is entirely up to you), so then string your next egg & make a gentle double knot again. Repeat the process.
9. The string length I used was 1.2mts giving me plenty of room to hang nicely.
10. Find somewhere to hang your Easter Egg garland & enjoy.

Have fun.


Monday, February 10, 2014

DIY Eggstra Special Easter Basket

I have just completed my first PDF printable product. After loads of mucking around & making sure it was perfect, I am happy to say it's all ready to go.

Printable DIY Easter Personalised Basket

Both designs are party of my Easter collection which can be personalised with the name of your choice.
They are super easy, I have had a few friends trial them to make sure they were OK.
Everything passed with flying colours.


They are great price of only $5.00
All you have to do is advise the name you'd like & I will have your file emailed back within 24 hours.


You can find both designs along with my Easter cushions in my shop.


Thursday, February 6, 2014

6 Valentine DIY activities for the kids to melt your heart

Love isn't just for the grown ups on Valentines day, it can be for the kids too.
I know that I would be so completely chuffed if my kids made something just for the simple fact  to tell me they loved me. I have to admit I am not going to hope something like this will be ready & waiting for me February 14th, my husband isn't that organised to make it happen.

However the thought of it melts me heart. 

My two favourite picks would have to be the hand prints (1) & valentine crown (4).


Valentine DIY for kids - 1  2  3  4  5  6

I hope you get something as divine from your kids. If you do please let me know so I can be completely envious. You can post them on my facebook page.


Monday, January 27, 2014

Easter Inspiration

Christmas has been & gone & now easter is just around the corner. Could time be flying by any quicker?

I am still working on my 2014 Easter collection which will be released 1st February 2014. Like with every collection I do I always have inspirational images & colours that help me guide my creations along.

Here are the lovely images I have found for this years inspiration. I am just head over heels about the gorgeous soft colours. Softness in design & pretty colours seem to combine with Easter so well for me. I just think of soft cute bunnies, soft apple green grass for the eggs to be laying in, pastel & muted colours, ribbons, white egg cups & a hint of vintage design & styling is my interpretation of Easter.